You need to configure Vernon CMS to read your XML file.
Want to watch a video of this process? See our XML Import: Part 2 video tutorial (YouTube).
Overview
To set up an XML configuration, you need to:
1.Set the parameters.
2.Set the field mapping.
3.Set the record matching.
4.Save the configuration.
How to set the parameters
1.Go to the Tools menu > XML > XML Import > Configuration.
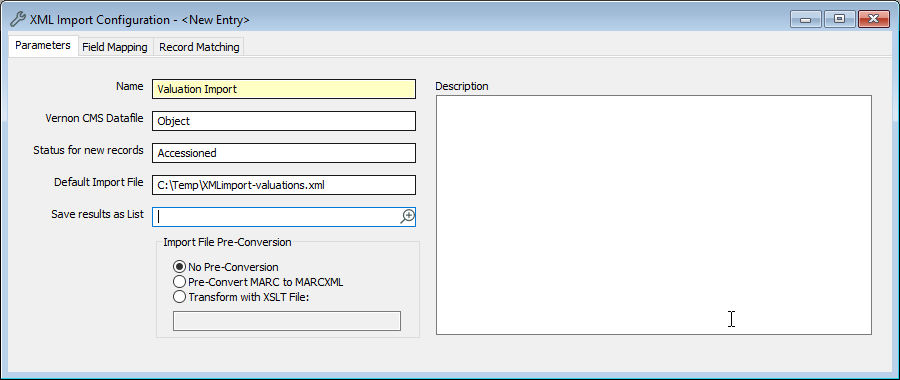
2.In the XML Import Configuration window, on the Parameters tab, in the Name field, enter a name for the XML Configuration. For example, Valuation Import.
3.In the Vernon Datafile field, enter the name of the datafile you'll be importing data into and press Enter. For example, Object. Select the datafile from the list.
4.In the Status for new records field, select a status. For example, Accessioned. You'll need to do this even if you aren't creating new records.
5.In the Default Import File field, enter the filepath and filename of the XML file. For example, C:\temp\valuations.xml.

The XML Import Configuration window, on the Parameters tab.
How to set the field mapping
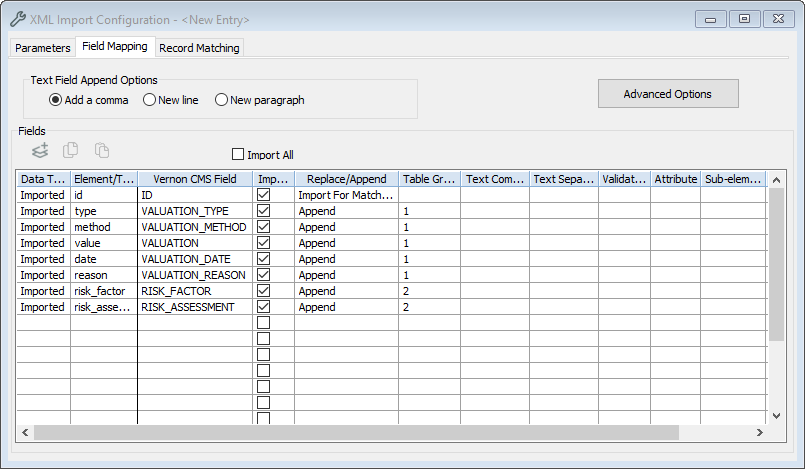
1.In the Field Mapping tab, under Fields, click the Get element headings from XML file button  . The headings from your spreadsheet will be imported into the Element/Text column of the table. The Data Type column will automatically be set to Import.
2.In the Vernon CMS Field column, select the field you want the data to go into.
3.In the Import? column, select the checkbox.
4.In the Replace/Append column, select whether the imported data should replace any existing data in the field, or be appended to it.
5.If you are importing data into a table, use the Table Group column. Enter matching numbers for all the fields that belong to the same table. In this example, all the fields in the Valuation table have "1", and all the fields in the Risk Assessment table have "2".

The XML Import Configuration window, on the Field Mapping tab.
How to set the record matching
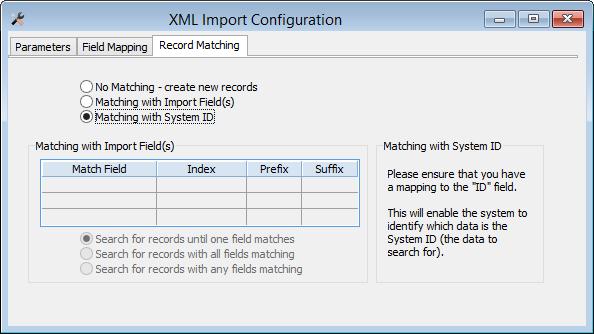
In the Record Matching tab, select one of the following options:
•If you're creating new records, select No Matching - create new records.
•If you're matching with the Accession Number, select Matching with Import Field(s).
oIn the table, in the Match Field column, select Accession Number.
oIn the Index column, select Accession Number Index | ACCESSION_NO_INDEX.
•If you're matching with the System ID, select Matching with System ID.

How to save the XML configuration
Click Save in the toolbar.
Next step: Running the import
Previous step: Preparing your data for import